![]()
Photo tips
![]() Direction of light
Direction of light
 Photography tips
& techniques - direction of light
Light is the most important element in photography. Even the term itself means "writing with light". Light determines how your photographs will look. It will define texture and structure of your subject. Creative use of light will allow us to add three-dimensional feeling to the flat, two-dimensional world of the photographic medium. Even light itself can be the subject of a photographic image. By understanding the impact of light, you will be able to have a more creative approach to your photography.
The quality of light refers to direction, character of the source (directional or soft / diffused), and tonal value (colour). Directional light of a bright, sunny day will bring out the texture and form of your subject. However, direct light will also increase contrast by enhancing bright highlights and deepening the shadows. It will define sharp edges in your images and produce a three-dimensional feeling to the image by creating the illusion of depth.
Direction of hard light on a sunny day is also important. It depends on the camera position in relation to the subject and position of the sun in the sky. The least appealing use of a light source is when it is directly shining over your shoulder (front lighting). This produces a flat, brightly lit subject that reveals little in terms of texture and form. There will be no shadows to produce the illusion of depth, or there will a be a strong shadow directly behind your subject (think of the photographs you took with a flash attached directly to your camera).
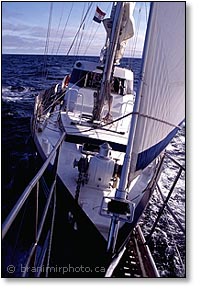
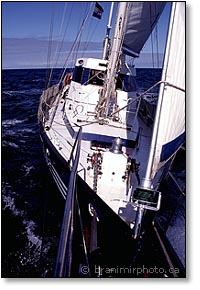
Side lighting is when the light source is at an angle to the photographer's viewpoint. Presence of brightly lit highlights and dark shadows create a strong contrast, giving a well defined form to your subject. Side lighting will bring out the surface texture in animal fur and the illusion of depth in landscapes. If you can not move around and position yourself to take advantage of side lighting, just choose a different time of the day to take your photograph. Look at the two examples above. The photograph on the left was taken in early morning hours. The sun was low on the horizon, casting long, soft shadows.
The sailboat was on exactly the same course in second photograph. The only thing that changed was the time of the day the photograph was taken. Strong, late afternoon light caused shadows to be better defined, and be positioned on a completely opposite side of the boat. The sun was approximately 45 degrees on the left, giving a combination of front and side lighting. Compare the two images and look for differences. Which image provides better illusion of depth? Three-dimensional form? Can you see all details of cockpit or anchor winch in both photographs?
Back lighting is when the light source is directly behind the subject. Quite often the effect will be dramatic. This is the most difficult situation for proper measurement of exposure in highlight and shadow areas. However, the rewards are well worth the effort. Striking graphic effect of silhouettes, or soft rim lighting are examples of effects when this type of light source is used.
If you set up the camera exposure to properly capture detail in bright areas for rim lighting (like model's hair in photograph on the left), you run the risk of blocking out details in shadow areas. On the other hand, if you try to adjust your exposure to capture minute shadow details (model's face), it is easy to completely overexpose the highlights. You either have to decide which element in your photograph is important and sacrifice the rest, or bring in additional light to brighten up the shadows. This can be accomplished by using any kind of reflective surface, or a fill-in flash.
30 December, 2004
Contact us ![]() Privacy policy
Privacy policy ![]() Terms of use
Terms of use
Copyright © Branimir Gjetvaj, all rights reserved
www.branimirphoto.ca

