![]()
Photo tips
![]() Depth of field
Depth of field
 Photography
tips & techniques - depth of field and selective use of focusing point
One of the most difficult techniques in photography is achieving a sharp focus. This is why we see such a success and popularity of autofocus cameras. Camera lens, same as the human eye, can only focus at one point at the time. You do not believe me? Try holding a finger in front of your face and focus your eyes on it. The finger will appear sharp, but everything arround it will be slightly blurred. Now, shift your attention at the background. Instantly, the background will appear sharp but your finger will be out of focus. We usually do not notice this because our eyes have the abbility to re-focus very quckly and fool our brain into thinking that everything around us is bright and clear (unless we had a few drinks the previous night, of course).
Like our eyes, camera lens will render the subject and every point positioned at a same distance plane as being truly sharp. However, objects in front of that plane and behind it, may also appear acceptably sharp. Here is where we introduce the term "depth of field" (DoF). There are numerous, rather similar definitions for the DoF; let's stick with this one:
Depth of field is the zone in front and behind the point of actual, or critical, focus where the eye percieves the image to be in focus. DoF refers to the section of a photograph, from the nearest to the farthest point from the camera, which appears to be in sharp focus. Do not confuse the depth of field with a "depth of focus"; the area in front and behind the film within which the circle of confusion for a given light ray would be small enough to produca an acceptably sharp image. Confused about the circles of confusion? Do not worry - we will talk about them later on. You will also find a list of links with further reading material at the end of this article.
Beside the selective use of light and film exposure, depth of field provides one of the main creative elements in photography. So, how can we use the zone of sharp focus to our advantage?
Begginer photographers often do not consider the power of selective focus in enhancing their images. We find a subject we are interested in, aim our camera, press the button, and if we have an autofocus feature available, we take a "correctly focused" image. The usual focusing problems are those of accuarcy and not of selection. What to do if we have a group of subjects at various distances (e.g. a tree at a base of a mountain, herd of deer grazing in a field)? Should they all appear in sharp focus, or should we keep some subjects slightly blurred? If there is insufficient light, we often do not have a choice - we have to use a wide lens opening (aperture) to allow for the maximum amount of light to reach the film. Hence, we might be limited to only one narrow zone of sharp focus. Which one?
As the area of sharp focus is expected to coincide with the main point of interest (eye in the human or animal portrait, or an object / figure standing in front of a wider background), it is that point where the human eye will automatically be drawn to. The direction of focus and attention will lead from unsharp to sharp. Yes, we can use the selective focus to direct the viewer's attention.
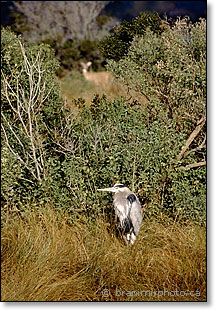
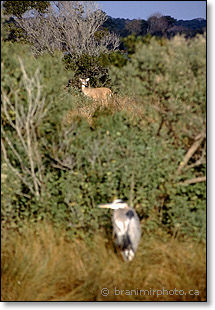
Have a look at the two photographs above. They were taken at the Chincoteague National Wildlife Refuge (Virginia, U.S.A.) just seconds apart. Both images were taken with a 300 mm lens at f/4 aperture opening. The Great Blue Heron I was photographing was at the centre of my interest, hence I kept the lens focused at the same plane field as the bird. The wide aperture diameter of my lens produced a shallow DoF: only a small portion of foreground and background appears acceptably sharp. Suddenly, in the corner of my eye (out of focus), I noticed a White-tailed deer emerging through an opening in vegetation. I quickly changed the focusing point of my lens, to make the image of the deer appear sharp. In the second photograph the focus is progressive, leading the eye rapidly upward from blurred foreground to the zone of sharp focus. By deciding to change the point of maximum focus, I changed the subject of viewer's attention.
Part 2: Creative use of the shallow depth of field and circles of confusion
25 April, 2004
Contact us ![]() Privacy policy
Privacy policy ![]() Terms of use
Terms of use
Copyright © Branimir Gjetvaj, all rights reserved.
www.branimirphoto.ca

